Sunday, December 18, 2011

Ipad carrying cases

So our school district was lucky enough to have a donor donate enough money to buy every middle school and high school student their own Ipad to use for "educational" reasons. Initially a lot of parents didn't want them because that is one more thing to monitor for your kids, to lose, to break, to accessorize, to argue about. (if you have pre-teens and teenagers you know what I'm talking about!) Anyway, I have 3 kids in that age group so we have 3 Ipad that are leased to us from the school and we have to monitor, try to not break or lose, accessorize and argue about. They are not supposed to download their own apps (school rule) so we don't have to worry about that. It's mostly the touch screen fascination that we have to monitor and the mindless time wasting that goes on. But, my kids are good and we haven't had too many problems.

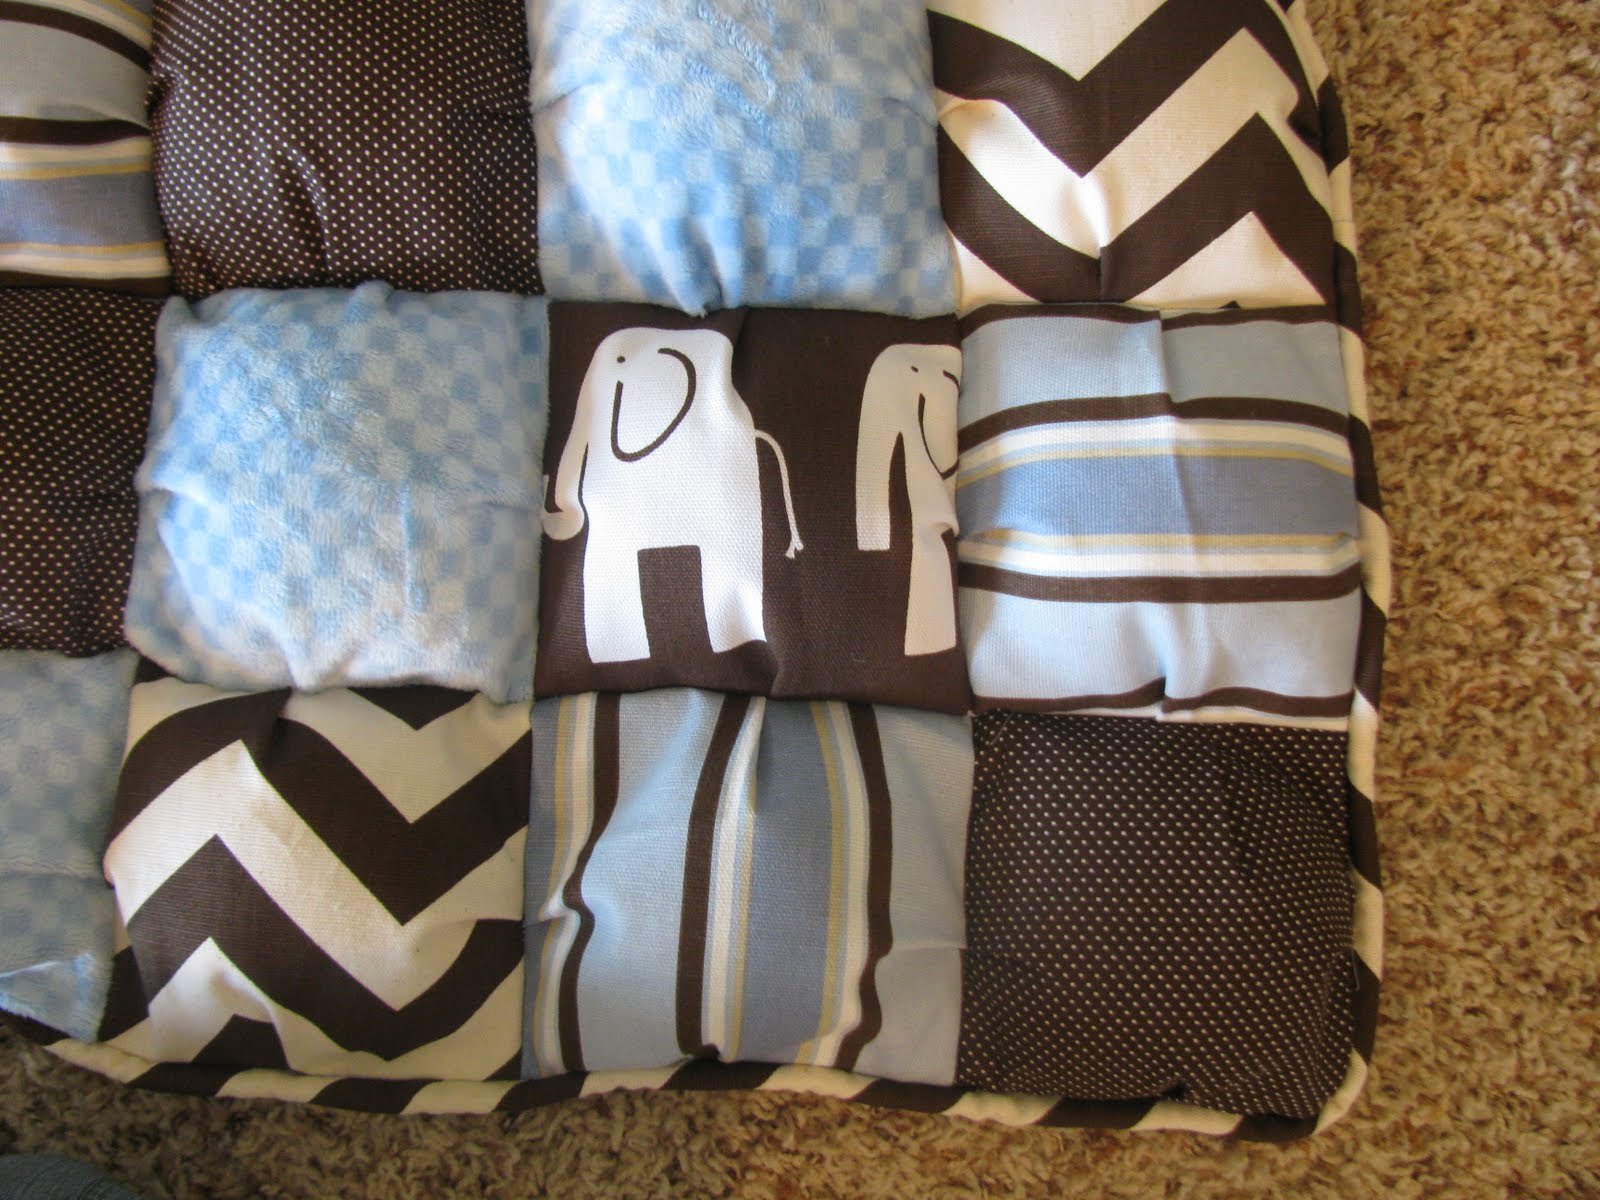
Which brings me to the point of this post- to post pictures of all the ipad carrying cases I have been making! Teachers need them, students need them so why not whip up 10 or 20 to sell and to give as gifts? They are easy to make and fun to play with different trims and ribbons to make them all cute. I've mostly made girl ones because the little handles make them look kinda like a purse. I did make one boy one out of camo material without the handles for my son and he says he likes it. I didn't put any cardboard or hard siding inside which is why I call them carrying cases rather than cases, because they should still be in a hard case first and then slipped inside this padded carrying case. They have made great gifts for my kids teachers and friends for Christmas! They have a coordinating lining fabric inside and close with a long piece of velcro that is sewed into the lining. I think I forgot to take pictures of 5 or 6 others I made.

So contact me if you want some made and I'll find some cute fabric for you!


I can't figure out why these ones are sideways, I've tried everything so you're just going to have to turn your head to see them right...

Tuesday, November 29, 2011

Puffy/Taggie/Texture Toy

I've never been one to make up a lot of projects. I follow a pattern or an example great but originality is hard for me. Also throwing away awkward shaped leftover fabric is hard for me too because I know something could be done with that leftover fabric. Having made tons and tons of puffy quilts, I wanted to make something we could take along and that more people could have. I know taggie blankets are popular with kids and they like to play with different textures. So I came up with a mini puffy/taggie/texture toy that is about a foot square.

It has 25 mini puffs, sewn together just like a large puffy quilt. Then ribbon tags are added and a minky back makes it even more fun to play with! Every time my little 1 year old son sees one of these around the house he immediately brings it to his cheek and rubs it on his cheek. Several moms at my first craft fair this weekend thought they were cool too and bought them! So I'm trying them out on my etsy site as well.

I'm so excited to have finally come up with something on my own! Now I just need a better name... which leads me my first giveaway! If I can get 25 name suggestions from different people, I'll pick the best one and send you one of my puffy/taggie/texture toys. Leave your comment!


linked to: http://linda-coastalcharm.blogspot.com/
www.sewstylishboutique.blogspot.com
www.strictly-homemade.blogspot.com

Friday, November 11, 2011

Privilege

Sometimes we are lucky enough to use our talents to bless and help other people. I was honored to help a good friend and her family with my sewing talents last week. They had a preemie baby who lived a short 10 days then passed away. She was only 1 pound 1 ounce and born at 27 weeks. One thing my friend did not want to do was shop for a dress for the baby for the funeral. A doll dress would be too big anyway, a Barbie dress would probably be closer to the size, but not wide enough. So I offered to make one. It was a pleasure and a privilege to help them during this trying time.

I took a few doll dress patterns that I have a figured out how it would best fit on a such a little baby with the least amount of disturbance. I decided to not do sleeves and to make it a wrap dress that would fit around her how ever small she was. I put an adjustable velcro closure on the side so when you wrapped it, it could be wrapped tighter if needed. I made it long and with two skirts, two different colors of lace, and several ribbon bows. I think a girl needs a pretty dress no matter how small or for how short of an amount of time! It did not take long to make and I loved how it turned out. I do wish I had made it probably 1/2 the size after I saw the little baby at the funeral because I think it was way too big.

There aren't many options for parents with micro-preemies. After searching online there are several things you can buy for more than 50$ and they will ship the next day. I think it's a great option for a friend to make something because it'll mean more and be one less thing that a grieving parent has to worry about! Thank you friends for giving me the opportunity to give you a gift in your time of need.


Craft fair craziness...

So this is the first time I'm going to do a craft fair and all I can say is, "What was I thinking???" Actually I'm really excited but super stressed about getting everything done in time. Also if we'll have enough to fill up our table. These are some super cute apron and baker's hat sets that I've been working on. My girls all want one and if there are any left over, they'll get one for Christmas! I love these fun, bright fabrics. On my etsy shop as well.


Tuesday, October 25, 2011

Fries with that?

So every year I swear I'm not doing anymore Halloween costumes, but I always do. Mostly for my little kids because I figure the big kids can come up with something on their own. This year I saw a picture somewhere of condiment costumes and thought it was so cute. So I got a yard of red and yellow felt, stitched it up in the back, put a casing around the neck and added elastic, cut out some felt letters and glued them on. The hats were plastic from a round ice cream bucket covered with felt and a small pot I found in the garage. Wa-la! Ketchup and mustard bottles. Easy and cute. My boys are cute too.


Sunday, September 25, 2011

Fall Wreath

So I wanted a fall wreath, not Halloween. I scored a good deal on a huge pack of paper that included fall, Halloween, and Christmas papers. I got a straw wreath with a 40% off coupon and got started. I cut 10 pieces of paper into strips, they were anywhere from 1/4" up to 1/2" wide. I curled them around my fingers about 4 times, stuck a straight pin in them and pushed it into the wreath. Then I repeated that about 200 times. I picked a cute "Jack-Be-Little" pumpkin from the garden and hung it on my wall. (I planted these pumpkins specifically because I want to decorate with them every year but I refuse to buy them from the store.)

I think I'll make a few more for some other holidays!

Friday, September 23, 2011

Hugest puffy quilt so far

So "hugest" probably isn't a word, but this blanket I made was sure HUGE! A client ordered a full size puffy quilt for her little girls new big girl bed. It was pretty much like making 4 crib size quilts and then attaching them together. I have to say that it looks amazing and so comfy! I also know why I don't want to make many more of them that big. They are so heavy and hard to finish off because the end product pulls so much on my machine. But, I propped it up on some chairs and the table next to me and pushed through the heavy part. It's beautiful and I hope the lucky little girl in North Carolina likes it as much as I did!

Here's a picture of my little guy breaking it in for me. He loves to lay down on them but I shoo him away quick so no grubbies get on the new quilt!

They also ordered a valance and curtain panels to match. The valance is so cute in the horse and boot fabric from Riley Blake. The panels are bright pink with a large brown band at the bottom and they are lined to block out almost all light. I used a really heavy duty lining that is a virtual light and heat barrier.
The bed skirt seemed like miles and miles of fabric all gathered up to create a really full skirt. The brown band at the bottom is a miniature of the brown band on the curtain panels. It turned out so cute!

Thursday, September 8, 2011

Love this blue and brown!

Here is the surprise for my SIL (hope she's slow to read my blog!) because I couldn't wait to post it! I used all scraps from making her baby set to make her a matching puffy quilt. I loved working with these fabrics again and I love when there are different textures mixed into the same quilt. There is a medium weight fabric, a minky fabric, and a cotton. I love the piping around the edge and I think I'll start making more of my quilts with a piping edge. This could be used as a play mat, a throw quilt on the end of a bed, a quilt to snuggle on cold Wyoming nights (for our 7-8 month winters!), or even a throw rug on the ground in front of a crib. I can't believe I got it ready for her baby shower which is in 5 days. Now to finish the valances and her baby's room is done, well not the painting but that's not my department!


Matches this:

Wednesday, August 31, 2011

Urban Zoologie Owl- another favorite fabric!

I've had the chance to work with more fun fabric recently! I'm making a baby bedding set for a gal in New York City! All the way from little ole' Wyoming. It's turned out so fun and comfy and she did a great job picking fabrics! I've learned a few things along the way too, like 2 thick layers of batting plus two layers of minky fabric do NOT fit in my sewing machine. And, you need to use extra pins on super stretchy fabric. Everything went fairly smoothly though and I'm hoping the orders will keep rolling in because it's so much fun staying home and getting to work with fabrics that are so cute.

The double sided minky, plus piping crib skirt sitting on top of the crib sheet (Urban Zoologie Cream Owl) on top of a cotton cream and orange single pleat crib skirt.


The side view of the crib bumper and sheet.

The pillow, blanket, bumper, sheet and skirt.

The minky backed blanket.

Wednesday, August 24, 2011

More baby's room stuff

So I'm busy working on the rest of my SIL's baby room stuff. It gets more fun the more I work on it thanks to the fun fabrics! Can you believe I don't have a crib to set the stuff up in and take pictures? After 6 kids, we got rid of the crib and have a mattress waiting for the toddler bed. So my kitchen table had to act as the crib.

I have a removable boppy cover:


A blue checkered minky sheet (my new favorite fabric) on top of a striped and blue and brown, 3 pleated crib skirt:


The whole ensemble (so far):

Last I am making the crib bumper (introducing 2 new coordinating fabrics that haven't been seen yet!) and 2 basket liners. Depending on the left over fabric we may come up with a valance or curtains. And I may throw in a surprise... shhhhh.

Complete baby bedding sets available at my etsy shop!
http://www.etsy.com/shop/OnceUponaChildhood?ref=si_shop

Saturday, August 20, 2011

I've been waiting...

To make something out of this fabric! I know this "chevron" fabric is trendy right now and I know a million people have made pillows from it. I've been dying to get my hands on some and my SIL gave me the perfect chance. I'm making her baby's room stuff and this is the pillow for her rocking chair. I love it!


I'm thinking that a big stack of these pillows in all different colors would be great for a craft fair right before Christmas. What do you think? Would you buy one for an easy present that anyone would love? How much would you pay? What color do you want?

Also, her diaper stacker. Excuse the nasty dresser that it is hanging from. And I need to spend some more time with the iron but then it'll look great! Can't wait to meet my new little nephew and also to get the rest of the baby bedding done.

Wednesday, August 17, 2011

Bar-b-q Chicken Salad

So awhile back I was on a "Whole Foods" kick, just cooking more nutritious meals for my family out of whole foods and avoiding all processed foods. Summer came and I lost track if I was doing better with our meals but I came across this dinner idea and now I'm back to thinking about it! I LOVE COLOR in my food. I can't stand when there is only one color on the plate. This salad is beautiful on a white plate!

I make dinner for 8 so this is the amount of stuff I used:

Cut up your 2 pounds of boneless, skinless chicken and cook it in a small amount of oil.
Toss with 1 cup of bbq sauce (if you made this homemade it would be healthier! I bought mine).
Lay on a bed of lettuce.
Mix up a relish of corn, black beans, and tomatoes. I used 6 roma tomatoes, 2 cans of corn, and about 1 1/2 cups of black beans.
Top the chicken with the relish.
Sprinkle with shredded cheese and crushed up tortilla chips.
Garnish with sour cream or ranch and salsa.

YUMMMMMM!!!!

Add a side of stir-fry'd summer squash and steamed green beans and you have a great "Whole Foods" dinner from the garden!

Monday, August 15, 2011

Wedding Dress to Twin Blessing Blankets!

That's right. I have a friend who cut up her wedding dress so I could make her newborn twin girls blessing blankets. How sweet is that? She did the cutting up of the dress, not me. And she used the bleach pen on the stains, not me. Phew- I didn't mess it up, thank goodness.


We used the satin under skirt from the dress for the binding (cut into long strips and sewed together). We used the lace overlay for one side of the blanket. We used the pretty bottom lace for added interest on top of the lace side. We used white minky (not on the wedding dress) for the other side. You could see through the lace side but the minky fabric is double sided and fairly thick so it added bulk to the blanket. Then I found some white rosettes and used those to make the ties look nicer than white yarn. I tied all of the layers together in 9 places.

Then I doubled it all for the other blanket for baby #2!

They are meaningful, resourceful, and beautiful!

Tuesday, August 9, 2011

Kindle Cover

So my husband surprised me with a Kindle for my birthday and I immediately thought of the cover I wanted to make for it. I just wanted to protect it and store it so it would have less of a chance of getting ruined (in a house with 6 kids the likelihood is very high!) So I finally pulled out some fabric that I snagged from my mom's house last time I was there, and got busy.

I used some heavyweight upholstery fabric, a layer of lining, a layer of batting, and a layer of stiff plastic craft stuff (don't know the name).

When I was done I think I decided I could do without the layer of batting since the fabric itself was so heavy. It was hard to get it all in my sewing machine because it was so thick.

Quick tutorial: Measure your fabric, batting and lining to be 1 inch larger on the 2 sides and bottom of kindle and about 4 inches bigger than the top of the kindle. Cut it all out. Layer it with the batting in the middle and fold the side and bottom edges together and sew the side and bottom edges together. Turn it inside out. Position a stiff velcro piece about 1/2 inch from the top of one edge and the soft velcro side 1/2 inch from the top of the opposite edge and sew them into place. Measure the stiff plastic craft stuff to fit the front and back, being only as tall as your kindle is, and cut two pieces to slide into the layers that are already sewn together. Slide them in before continuing. Turn over the top edge so the velcro is now on the inside

and lined up with each other, and top stitch through all layers sewing the turned over edge down about 1/4 inch from the top and again about 2 inches from the top. Wah la!

I think it would look cute with a little label on the front that says something like, "Mom's Kindle- stay away!" It would get the message across and jazz it up a bit!