Linked to www.betweennapsontheporch.blogspot.com
Showing posts with label my girls. Show all posts
Sunday, February 5, 2012
Super cute skirt
I love this skirt that I made from a design seen on "Little Birdie Secrets" blog. My sister in law found this and passed it on to me. I made one for my 14 year old daughter and she loves it! I made a few changes to the one on the blog and if I made it again, I'd make a few more changes again. But I love it enough to maybe make one for each of my other girls and myself!
Linked to www.betweennapsontheporch.blogspot.com

Linked to www.betweennapsontheporch.blogspot.com
Sunday, December 18, 2011
Ipad carrying cases
So our school district was lucky enough to have a donor donate enough money to buy every middle school and high school student their own Ipad to use for "educational" reasons. Initially a lot of parents didn't want them because that is one more thing to monitor for your kids, to lose, to break, to accessorize, to argue about. (if you have pre-teens and teenagers you know what I'm talking about!) Anyway, I have 3 kids in that age group so we have 3 Ipad that are leased to us from the school and we have to monitor, try to not break or lose, accessorize and argue about. They are not supposed to download their own apps (school rule) so we don't have to worry about that. It's mostly the touch screen fascination that we have to monitor and the mindless time wasting that goes on. But, my kids are good and we haven't had too many problems.
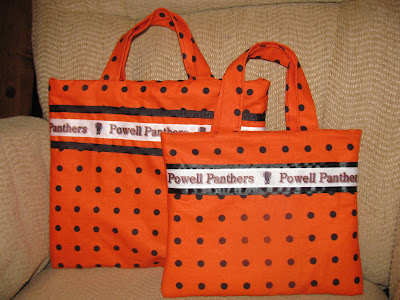
Which brings me to the point of this post- to post pictures of all the ipad carrying cases I have been making! Teachers need them, students need them so why not whip up 10 or 20 to sell and to give as gifts? They are easy to make and fun to play with different trims and ribbons to make them all cute. I've mostly made girl ones because the little handles make them look kinda like a purse. I did make one boy one out of camo material without the handles for my son and he says he likes it. I didn't put any cardboard or hard siding inside which is why I call them carrying cases rather than cases, because they should still be in a hard case first and then slipped inside this padded carrying case. They have made great gifts for my kids teachers and friends for Christmas! They have a coordinating lining fabric inside and close with a long piece of velcro that is sewed into the lining. I think I forgot to take pictures of 5 or 6 others I made.
So contact me if you want some made and I'll find some cute fabric for you!


I can't figure out why these ones are sideways, I've tried everything so you're just going to have to turn your head to see them right...

Which brings me to the point of this post- to post pictures of all the ipad carrying cases I have been making! Teachers need them, students need them so why not whip up 10 or 20 to sell and to give as gifts? They are easy to make and fun to play with different trims and ribbons to make them all cute. I've mostly made girl ones because the little handles make them look kinda like a purse. I did make one boy one out of camo material without the handles for my son and he says he likes it. I didn't put any cardboard or hard siding inside which is why I call them carrying cases rather than cases, because they should still be in a hard case first and then slipped inside this padded carrying case. They have made great gifts for my kids teachers and friends for Christmas! They have a coordinating lining fabric inside and close with a long piece of velcro that is sewed into the lining. I think I forgot to take pictures of 5 or 6 others I made.
So contact me if you want some made and I'll find some cute fabric for you!
I can't figure out why these ones are sideways, I've tried everything so you're just going to have to turn your head to see them right...
Monday, July 4, 2011
Blue and White Apron
So my sister got all of the tablecloths used at her wedding 5 years ago and gave me some. I'm the queen of turning "old" fabric into something new with my scrap box. There was plenty of fabric and scraps to make another cute apron set. I'm getting faster at making them and every time my girls ask me to make one for them. Wait for Christmas girls!
Sunday, June 26, 2011
Why did I buy a pattern?
So my 13 year old daughter keeps growing, as they tend to do. So she has no church clothes. I made her a skirt awhile back and looked in vain for other dresses. They all have spaghetti straps or are too short these days in the store. So I tackled a dress this week. At the fabric store I told her to look at patterns while I did some other shopping. When I met her at the patterns she had found a really cute dress, but the pattern wasn't on sale. I am not in the market to pay full price for patterns ($16.95!!!). PLEASE don't EVER buy a pattern at full price. I wait for the $0.99 or $1.99 sale and then stock up on any pattern I think is cute. So we looked at the $2.99 "See and Sew" rack. There were parts of several dresses that she liked but not one pattern had everything. She wanted a summer dress but she likes long sleeves and most real summer dresses are sleeveless or spaghetti straps. So she found this pattern and really liked the SASH.
So I was supposed to build a new dress around the sash. Since I had SIX children with me (not recommending shopping at a fabric store with 6 kids), I grabbed the pattern and away we went. When I got home, I realized the pattern only came in size 8-16 women's. Well my daughter is between girls and juniors sizes so she was too small for women's size 8. So I had to figure out how to make this dress with the cool sash and
1. add sleeves
2. change the bodice lining since it has sleeves now to a yoke lining
3. Make the V neck not so deep
4. change it to a smaller size to fit a 13 year old
So after a phone call to my mom who asked "What were you thinking?", I started cutting out the fabric. I cut out a size 8 instead of cutting it out smaller, in case I cut it out too small. The yoke wasn't as hard to figure out as I had thought it would be. I used sleeves from another dress pattern, made the bodice a little shorter, tried it on several times, and hoped for the best. She is thrilled with the outcome and likes the bright, springtime colors, and she especially likes the SASH! I think it's way cuter in person and the pictures make it look a little frumpy, which it isn't.
Monday, June 6, 2011
Managing the summer chaos
With six kids, there is chaos. No way around it. There is also a mom who wants to stay sane and accomplish something each day. I want the kids to learn to get things done first and then they can play for most of the day. I want the kids to learn that we have to work together as a family to keep things running smoothly. So a few years ago we started "Summer Stations". The kids have to get their regular chores done first (dishes, laundry, bedrooms, garbage, sweeping etc.) and then we spend an hour and a half or so rotating through different stations. They change periodically but usually include piano practice, reading, writing, playing with a younger sibling, outside work (weeding or watering), and sometimes a 'mom's choice' chore. We are usually done with all the work and stations by 10:00 and then the kids get to be free for the rest of the day. It helps me feel like we accomplish something and get the stuff I want done (piano, reading etc.), helps dad in the yard, and helps them in their responsibilities.
I recently made a chart to keep it all straight. The pictures of the kids are all velcro-ed on and can be moved around so they can start on different stations each week. I included the 2 little kids but they don't usually do stations as one is napping and the other is being played with.

Along the bottom I have a pocket for the bigger kids to earn good behavior computer time. Every stick is worth 10 minutes and they have to earn 30 minutes before they can redeem their minutes. Sticks can be taken away for bad behavior and added for doing extra chores. This way I don't have to listen to kids whine to play on the computer all the time. If they have the minutes and their chores are done, they can redeem them. Everyone is happy.
This is our regular chore chart. I'm not thrilled with the nails but haven't changed it to be something cuter yet. We just move the sticks around each week to rotate the jobs.
Linked Here:
http://www.skiptomylou.org/2011/06/06/made-by-you-monday-53/
http://www.homemakeronadime.com/
http://creatingreallyawesomefreethings.com/
I recently made a chart to keep it all straight. The pictures of the kids are all velcro-ed on and can be moved around so they can start on different stations each week. I included the 2 little kids but they don't usually do stations as one is napping and the other is being played with.
Along the bottom I have a pocket for the bigger kids to earn good behavior computer time. Every stick is worth 10 minutes and they have to earn 30 minutes before they can redeem their minutes. Sticks can be taken away for bad behavior and added for doing extra chores. This way I don't have to listen to kids whine to play on the computer all the time. If they have the minutes and their chores are done, they can redeem them. Everyone is happy.
This is our regular chore chart. I'm not thrilled with the nails but haven't changed it to be something cuter yet. We just move the sticks around each week to rotate the jobs.
http://www.skiptomylou.org/2011/06/06/made-by-you-monday-53/
http://www.homemakeronadime.com/
http://creatingreallyawesomefreethings.com/
Thursday, May 26, 2011
Holey jeans to cute shorts
Not just ordinary cut off jean shorts. I saw something in blog land a few weeks ago about adding a ruffle to the bottom of jean shorts. I have a couple of girls who I knew would love it, so I added it to my "I want to do" list in my head. The first day of summer vacation we cleaned out drawers and threw stuff away, put stuff in the laundry (who? my kids?), made a pile for donations, and a pile for mom to sew. I ended up with only two pairs of pants to add ruffles to. Here is how they turned out:


Here is an abbreviated tutorial:
1. Cut off pants above the holes in the knees.
2. Make two long strips of your fabric choice, about a yard long by 4 inches wide.
3. Sew the short ends together, forming a loop.
4. Fold the loop in half lengthwise so wrong sides are together.
5. Baste 3/8" inch on unfolded side of loop, leaving tails at the ends and not backstitching.
6. Pull up basting stitches so the long loop gathers itself.
7. Pin raw edges to the raw edges of the pant edge and pin so loop is same size as pant opening.
8. Sew.
9. Flip to the right side and press.
10. Top stitch close to the edge so you sew down the seam allowance on the inside.
e
OR instead of gathering, you can make little folds in the long loop so it looks like little pleats, like I did on the darker pants in the pictures.
So don't throw away holey jeans if they still fit! Transform them.
I posted on a few linky parties. Check them out on my side bar.
Thursday, May 12, 2011
Bed Sheets to curtains
All of the bedroom windows in our new house are now covered. It's taken over a year but now everyone can get dressed without the neighbors peeking! Not that we have neighbors... We still need to work on the bathroom windows.
My oldest daughter, 13, doesn't like to sleep with a flat sheet on her bed. No matter how much I prod and bug her, she won't do it. So I finally took her flat sheet, which matches the rest of her bedroom, cut it into two, cut off a strip at the bottom, made some tabs, sewed it all together- and now she has some tab top curtains that match the rest of her bedroom. I'll probably add a lining someday and maybe some sheers to spice it up a bit. If she ever decides to sleep with a flat sheet, we have solid color ones that match her room still.
Monday, May 9, 2011
More than a day skirt
So this should've taken a few hours to make but I ended up putting on the waistband wrong, not once but twice! So I had to pick it out and do it again and again. Then, Haley tried it on and it was too small. She's between a size 14 girls and a misses size 2 or 4 so I was kinda guessing the size anyway. So I picked it out again, made a new waistband and then it was done. So it was a bit of a pain but it was all my mistakes. I'm also not a big fan of hand stitching the entire hem and waistband, but I did it while watching a movie one night. Haley loves it! (and I'm glad it's done).
Friday, April 22, 2011
Girly apron set
This is a new apron set that I made. Camille was very mad that it wasn't for her. I'll keep it mind for a Christmas present for her! What does anyone think?
Saturday, January 1, 2011
Doll bed and bedding
So the last of my three girls is getting an American Girl doll bed for her birthday. I will NOT buy stuff from the catalog (except for the doll) so I get to figure out how to make everything for the girls. I made the first two beds a few years ago and this time I used a boy scout merit badge (wood working) to get my son to help me. We used scrap wood from the garage and followed a plan from www.ana-white.com (love her site!). We had a few mishaps along the way of course but overall it turned out pretty sturdy and cute. I found some scrap fabric and threw together a quilt and pillow and now we have a birthday present for FREE! (and a wood working merit badge)

Labels:
american girl clothes,
my girls,
sewing,
wood working
Tuesday, November 2, 2010
Thursday, August 19, 2010
Keeping Track of the crafts
I thought I'd start this blog as an off-shoot of our family blog to keep track of some of my crafts and sewing projects I'm working on or have completed through the years. I don't claim to be a super seamstress or crafter, but it's something I enjoy when I have time. Looking at some of my past projects, I feel rather inadequate compared to a lot of crafters and seamstress out there but I stopped comparing myself long ago! I do it for the fun and often the necessity of saving money on store bought expensive items! I guess I'll post past projects and then I'll add additional projects that I finish or am working on.

Hanging baby supplies organizer for Dani's baby bedroom.

Crib skirt for Dani's baby room. Also has some valances for the windows.

American Girl Doll bed (I tried to make it look like one in the catalog that cost $80!) My mom made the little pillow.
Denim BYU blanket. It will have a pair once I get more fabric to finish the back. These will be on the boys beds in their new bedroom.
Baby boy blessing outfit. This was made for my first son 10 years ago out of left over fabric from my wedding dress.
My friend Chrissy helped teach me how to attempt decorating my first real cake. Okay, she did most of it! This is a hobby/craft I'd love to learn more of when I have time someday.
This is a cross stitch I made when my oldest was a baby- 12 years ago. I entered in the county fair this year and got a 2nd place ribbon (I think I won $6.00- more money for my next craft project!)
Christmas Eve pj's 2009. It's a lot of work to make 4 pairs of pj's! I bought Carter's for $3 so I didn't make his. Kids love getting homemade pj's rather than store bought though. THis was a tradition started in my family as a kid.
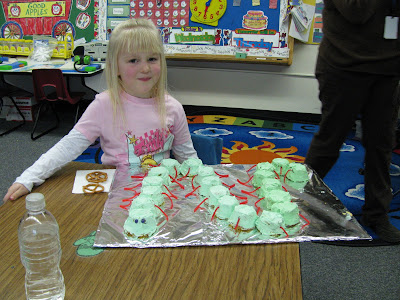
Caterpillar cupcakes for 1st grader birthday. I think I've made this particular treat for 3 different birthdays because the kids love it.

This is the one and only quilled thing I've made. I took an intro to quilling class and it's another craft/art that I would love to learn, when I have the time.

I think I've made over 30 Halloween costumes over the years. This was for my first son about 7 years ago. Go Cougs.

This is a horrible picture of a table my dad and I made one Thanksgiving holiday. It's my favorite piece of furniture in the house. It is no longer being used to store toilet paper (as seen in the picture) but is in it's rightful place in our entryway of our new house. I would love to build furniture sometime too and I've checked out the website called www.knock-offwood.com and I'm determined to make some stuff from there someday.

Cleopatra Halloween costume. I had a bunch of scrap stretchy fabric that I don't think I would've ever used for anything else so this worked perfectly.

Probably my favorite project is making matching girl and doll outfits. This was a Christmas dress for Haley and her doll several years ago.

This is a dress that I bought the fabric for off of the internet. I hate shopping for fabric on the internet because you can't touch it and see it while choosing. This turned out alright though.

I didn't make anything in this picture but I did put the leg work into finding the bedding Haley liked, choosing paint and accessories and putting it all together. I even "got" to paint the walls these bright colors. Her room is fun and energetic. My sister Alicia made the wall hanging of Haley's name.

Family Home Evening Chart. I ended up not liking the color I chose and the lettering on top could've been smaller. The empty place was reserved for our last baby who didn't have a name at the time because he wasn' t born yet! (Of course I still haven't made the name and he's almost 6 months old.)
Hanging baby supplies organizer for Dani's baby bedroom.
Crib skirt for Dani's baby room. Also has some valances for the windows.
American Girl Doll bed (I tried to make it look like one in the catalog that cost $80!) My mom made the little pillow.
This is the one and only quilled thing I've made. I took an intro to quilling class and it's another craft/art that I would love to learn, when I have the time.
I think I've made over 30 Halloween costumes over the years. This was for my first son about 7 years ago. Go Cougs.
This is a horrible picture of a table my dad and I made one Thanksgiving holiday. It's my favorite piece of furniture in the house. It is no longer being used to store toilet paper (as seen in the picture) but is in it's rightful place in our entryway of our new house. I would love to build furniture sometime too and I've checked out the website called www.knock-offwood.com and I'm determined to make some stuff from there someday.
Cleopatra Halloween costume. I had a bunch of scrap stretchy fabric that I don't think I would've ever used for anything else so this worked perfectly.
Probably my favorite project is making matching girl and doll outfits. This was a Christmas dress for Haley and her doll several years ago.
This is a dress that I bought the fabric for off of the internet. I hate shopping for fabric on the internet because you can't touch it and see it while choosing. This turned out alright though.
I didn't make anything in this picture but I did put the leg work into finding the bedding Haley liked, choosing paint and accessories and putting it all together. I even "got" to paint the walls these bright colors. Her room is fun and energetic. My sister Alicia made the wall hanging of Haley's name.
Family Home Evening Chart. I ended up not liking the color I chose and the lettering on top could've been smaller. The empty place was reserved for our last baby who didn't have a name at the time because he wasn' t born yet! (Of course I still haven't made the name and he's almost 6 months old.)
Labels:
american girl clothes,
baby,
cooking,
costumes,
dresses,
home decor,
my boys,
my girls,
pajamas
Subscribe to:
Posts (Atom)